GM Based TBI on an AMC 360

Waaayy back in 2002, I purchased a Howell-EFI fuel injection kit for my AMC 360 motor. This was installed on my 1985 Jeep Grand Wagoneer (FSJ), The Black Hole. Equipped with (relatively) modern electronic fuel injection, that FSJ made it through the Eisenhower Tunnel without vapor locking and over Vail Pass and on to Ouray, CO for the 2002 FSJ “Invasion”.
Fast forward to 2009. Several Jeeps later, I still have that same fuel injection kit, but it is now installed in my 1988 FSJ, SlushPuppy. However, things have changed. The motor has been outfitted with an Edelbrock Torker manifold (Why? Why not?) and the resulting changes in the MAP readings have thrown the stock chip calibration for a loop.
In 2008 I purchased a 1 ton Chevy flatbed truck with a liftgate. It had a TBI Chevy 350 in it. Seeing how well the stock Chevy system ran with timing control, I wanted the same benefits for my Jeep. The Howell system did not come with timing control. (Rumor has it that you can now request timing control for an extra cost. But I have not confirmed this.)
Sure, I could get a re-curved distributor, but I’d have to have it “re-curved” EVERY time I wanted to change my timing. To change the timing on a GM TBI system, it’s a simple matter of re-burning a chip.
I did some on-line research, looking for the best way to modify my TBI system. I looked at Moates.net and his all-in-one chip burner/emulator/reader called the AutoProm. I also looked at dynamicefi.com’s system, called Embedded lockers. And I looked at Affordable Fuel Injection’s turnkey system, too.
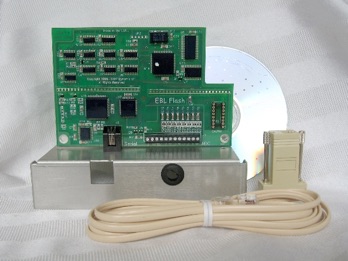
Dynamic EFI’s EBL system also required soldering of an adapter board, but it uses a proprietary software to re-program the ECM. This is GOOD because it gives you more frequent updates of what the ECM is actually doing. In stock form, the data output is pretty slow. (Think 300 baud modem days! The ECM output is actually 160 baud!!)
Affordable Fuel Injection (AFI) quoted me about $800 for a HEI distributor modified to work with my TBI system and a new harness (to add timing control) and a chip tuned for my setup.
PROS:
Inexpensive (compared to AFI)
Comes with a Tuner Pro license ($30 value!)
Works with more than one after-market software
Can use OEM bins. No proprietary format.
CONS:
Steeper learning curve. I knew nothing about bins or how to modify them
On-line forum at Moates.net is a very lonely place.
No immediate timing control.
PROS:
Inexpensive (Slightly less than Moates)
Better real time data display.
CONS:
Ya gotta solder FORTY little pins in place!
Proprietary software and bin files. Popular, but not *as* popular as OEM style bin files.
No immediate timing control.
PROS:
Computer timing control
Turnkey operation. Plug it in, fire it up. If it doesn’t work, you have someone to call and/or blame it on.
CONS:
EXPENSIVE! About double the cost of Moates.
One time deal: No future adjustment without sending away (and waiting) for a new chip.
And the WINNER IS: Moates.
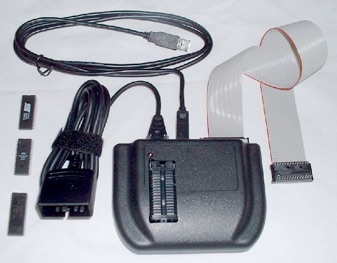
I purchased an AutProm, their G2X adapter (allows you to switch between bins without switching chips) and a socket booster (often needed with the GM ECMs).
So the question probably arises (if you’ve read everything up till now): Why did you buy a system that doesn’t allow you to immediately control timing since that’s what you wanted to do in the FIRST place????
Good question.
The reason I went with the AutoProm is because it offers real time emulation (no chip swapping) and I can ADD timing control to my system later.
See Distributor Welding for information on how to prep your AMC motor for timing control.
Now, on to the conversion!!!
MODIFYING A HOWELL HARNESS TO GET COMPUTERIZED TIMING CONTROL
I first needed to get all my parts. This is what I needed:
EST: (Electronic Spark Timing) aka ignition module. This is the heart of the conversion. It takes the distributor signal and advances the timing according to how the computer tells it. This module also directly drives the ignition coil. The GM coil looks a lot like the old Ford TFI (aka E-core) coils. The EST module is found under the distributor cap of Chevys and has THREE plugs connecting to it.
EST plugs: the input from the distributor can accept regular spade plugs, but the other two plugs are newer Weatherpak style connectors.
Off to the junkyard I went to get these items. I could get the EST new for about $38. And the Weatherpak connectors are actually available, too. HOWEVER, for just the two specialized plugs, it would have cost almost as much as the EST itself! Plus, getting the EST at the boneyard allowed me to scavenge the required connectors and make sure I got the right ones.
My first Junkyard expedition was a bust, since I wasn’t really looking for an EST at the time. I was more looking for the ECM plug so I could scavenge some plug wires. But I did score a nice upgraded steering wheel for my 2005 Impala!
The following week I hit paydirt, finding not only an EST with all the required plugs intact, but I also found another 1227747 ECM also. Even including the stock GM coil, it only cost $30 for EVERYTHING.
Back home I went with my new-found loot!
There are plenty of websites describing how to install this stuff, so I won’t go into that here. But I will tell you some things I discovered along the way:
DISCOVERY #1
The GM coil likes to be grounded. Who knew? I’ve never had to ground my regular “can” coils.
DISCOVERY #2
Don’t forget to ground the EST. I did remember to attach it to a heatsink (I used a long bar of aluminum), but forgot to ground the bar. The first time I fired it up, absolutely nothing happened. Duh.
DISCOVERY #3
AMC engines like A LOT of timing advance. The OEM Chevy way of setting up the motor is to pull the brown wire (EST breakout connector) and set the base timing to ZERO degrees. When I set my AMC360 to zero degrees, it would idle, but would not run in gear without throwing an EST code and going into limp home mode. I thought my junkyard EST was bad. Grrrr...
(Limp home mode offers absolutely NO timing advance until the motor gets to 2000 rpm and then the timing jumps to 20 degrees.)
After buying an NEW EST, I remembered reading that AMC’s like MORE advance than Chevy motors. The solution was to set the static timing to 10 degrees BTDC. This way, the motor will idle even in limp home mode. This is NOT the way Chevy designed the system to work, but remember, you are running this on an AMC motor. ;-)
DISCOVERY #4
You DON’T need a fancy tool to “unlock” the pins on the ECM connector. A large paper clip works just fine. Insert your new tool into the hole ABOVE the actual pin slot and it will release a catch inside and you can pull out your wire. Splice it to your new wiring and insert it in the your working connector. This is why I bought a spare ECM connector with as much wiring attached as possible.
RESULTS:
Having the ability to adjust fuel and timing advance tables is absolutely AWESOME! There is no other way I would have been able to get this system to run. The Torkker manifold puts out such a different MAP signal that any stock bin file would not work.
Incidentally, the MAP sensor is the ONLY sensor that I’ve found that is critical to good running. I can unplug just about any other sensor on the system and it’ll still run. Obviously, it won’t run WELL, but it does run.
The Tuner Pro software is absolutely AWESOME. If you are tuning, and your system is compatible with Tuner Pro, I HIGHLY recommend it. It’s absolutely free, but the $30 registration fee gets rid of the nag screen and it would STILL be a bargain even if Mark charged $60. Did I mention I like this software?
There is a lot of after-market and forum support for the GM TBI system. I have read about people being happy with the EBL system, but I like the idea of just modifying the chip on the regular standard, good ol’ GM system. They put millions of dollars of development into the system. Why not use it?
Millions of Astro vans can’t be wrong!
Moates’ system was under $400 for all the parts I needed. (You can get it cheaper if you don’t get the all-in-one AutoProm) With this system and some simple soldering of a 24 pin adapter, you replace the obsolete UV EPROM with a flash memory EEPROM. I also liked that they had an adapter to allow you to store and run different bins on the same chip. This route would not immediately add timing control, but WOULD allow me to adjust fuel tables.

I am really glad I did not order AFI’s distributor to get timing control. Not only was it hugely expensive, it was unnecessary, as I found that I can use my STOCK distributor to trigger a STOCK GM ignition module. All that was required was to bypass the mechanical advance with a little quick welding. (You can do this yourself or have it done.)
Within less than 20 different bins (short for binary file. It’s the tuning data), I have a smoothly running Jeep with timing control that I can change whenever I want or need to.
LESSONS LEARNED:
If I were to do this over, I would have not bought as much stuff up front. I would have started with just the Burn2 (EEPROM burner) and an ALDL cable. Real time emulation is a nice idea, but you need to have a second helper. One person to driver, one to modify the bin. For now, the bin switcher works fine. But am I happy? Absolutely.
But I could have saved myself some $$$ by not getting the AutoProm (Burn2 and the ALDL cable do the same thing, minus real time emulation).
BEWARE WHEN USING THE G2X switcher with the 27SF512 chip:
As it turns out, the 27SF512 EEPROM is NOT a 512KB memory chip. It’s only 64KB. The 512 reference is for 512 KiloBITS. Which, as everybody knows is 64 KiloBYTES. Duh.
NOVEMBER 2009 UPDATE:
After playing and modifying some stock timing tables and some bin files emailed to me, I decided to create my own from scratch.
I tried to emulate the stock distributor. To do that, you have to think of how the stock distributor adds or subtracts timing as engine loads and RPMs change.
I started with the mechanical advance. It’s a pretty simple device, really. As the distributor spins, centripetal force pulls on springs and the resulting action causes weights to move and advance the timing. The springs control the amount of change of the advance (slope of the curve) and a limit post controls the total amount of advance possible. High RPMs have the highest advance and it drops back down as RPMs decrease.
I simulated this by adding in timing to the table as the RPM increased, topping out at about 40 degrees. I set the idle RPM timing at 15 degrees and started ramping it up at at the 1000 RPM mark.
Simulating the vacuum advance timing was equally easy. Vacuum timing is hooked up to ported vacuum in most cases. Ported vacuum is zero at idle and rises as the throttle is opened partially. This is easily modeled by adding timing according to the MAP sensor reading. I originally made my vacuum timing “curve” too narrow and had to widen it and start dropping it off around MAP 60 or so. I had assumed that ported vacuum dropped as the throttle continued to open, but I found that at high MAP, the motor liked more advance..
Take a few drives after each adjustment and you’ll find the best timing curve for your motor. If it bogs in a certain area, advance the timing. If it starts to ping, back it off a bit in that area.
Incidentally, I also set the WARM SPARK BIAS to ZERO. Why? Because the computer SUBTRACTS this number from the main spark table in order to get the total spark advance. This allows for NEGATIVE advance (retarded spark) to be represented in the table without there actually being a negative number IN the table. If you look at a stock ASDU bin file, you will see the timing goes down to 9.84 degrees at high RPM, but the Warm Spark Bias is ALSO 9.84 degrees. Thus, the ACTUAL timing at that point is really ZERO degrees. Setting the warm spark bias to zero means that the timing in the table is really close to the Total Spark Advance at that point.
The same thing happens with COLD SPARK BIAS, but in that case, it works FOR YOU. Cold spark bias allows the timing to be adjusted (advanced or retarded) when the engine is cold and at lower MAP conditions (idle or very little throttle). There is a separate cold spark advance table (coolant compensation Spark Advance) that you can control this with.
I have not come up with a good reason to keep the WARM Spark Bias since AMC motors don’t need any retarded timing at normal operating temp that I have found and the main spark advance table is not affected by temperature.
I now have a totally custom timing table and a fuel map derived from the stock ASDU bin file.
I have also added a VSS and as a result had to turn off the EGR code and I also set the EGR On Temp to its maximum setting. I am hoping that the “hiway” cruise mode and DFCO (Deceleration Fuel Cut-Off) functions will help with gas mileage.