Installing Autopal H4 Headlights

After reading about other people raving about the so called “E-Code” headlights, I decided to upgrade my stock halogen lights to the newer H4 European style headlights.
I purchased a set of Autopal brand conversion headlights that used the H4 bulb. (This bulb is also known as a 9003 bulb.) The sets are available on ebay. Search for Autopal and 6054.
They arrived in a few days, well packaged but one of the lights did not work. It appeared that the solder connection was bad and they use high temp solder, so there was no fixing it. But what do you want for forty bucks? So I went and bought a set of new bulbs. They cost almost as much as the conversion kit!
I did email the seller and the seller made ME PAY FOR SHIPPING to return his DEFECTIVE (NOT broken in shipping!) product. Grrr. He DID offer to send me a working bulb, but for the price of shipping, I could have bought another bulb. But I wanted a matching set for testing purposes. That earned him a negative feedback rating from me. That’s just poor business in my opinion.
On to the conversion!
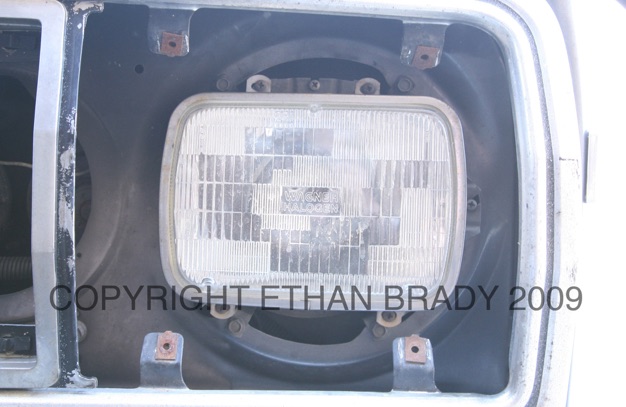
Here is the OEM halogen bulb:

Note that there are a total of SIX screws visible. You only want to remove the FOUR that are holding the metal retaining ring. Leave the other two alone. They are your adjusting and aiming screws.
This photo shows the adjusting screws in a better light:
Remove the 4 screws that hold the bezel. If your FSJ has round headlights, the bezel will obviously be different, but the concept is the same.
This is how it looks without the bezel:

Remove the 4 screws that hold the retaining ring and the headlight can be pulled out a few inches. You may have to coax the wiring to loosen up a bit. It shouldn’t happen, but hold the bulb securely in case the wiring comes off the back. You don’t want to drop the headlight since it is all glass and WILL shatter if dropped.
Now it is time to unpack your lights!
The above photos show the entire lens and the highlighted area shows you the arrow that is found on one edge of the bulb. This arrow points UP when the bulb is correctly installed.
Plug in the new headlight to your existing harness. Conveniently, the H4 bulb has the SAME plug as your halogen bulb. You do not need to upgrade your harness since the stock H4 bulbs do not draw any more current than your halogens.
Reattach the trim ring, but leave the bezel off so you have access to the aiming screws.
Short version on how to aim your “E-Code” lights:
You will need a flat wall and the ability to place your vehicle 25 feet away from the wall on a flat and level surface.
To start, place your truck up against the wall. Put a piece of tape marking the horizontal centerline of the bulb and the vertical center of both bulbs. You should now have two “+” marks on your wall. Put a horizontal tape mark THREE inches below the horizontal centerline.
Back up your truck 25 feet and turn on the lights.
You should see two bright spots and they should have a distinct pattern as compared to your old lights. The most noticeable thing is the sharp cut-off off the beam. The left side of the beam (as looking at it from the truck) is level and the right side is angled in an upward direction.
Adjust the VERTICAL aiming of your headlights so that the TOP of the bright spot is on this “lower” centerline.
Adjust your HORIZONTAL aiming so that the start of the angled portion is on the VERTICAL centerline.
Aiming of your new “E-code” headlights is very important since the beam is more concentrated than the DOT pattern. Aim too high and you’ll blind oncoming drivers and aim too low and you won’t gain the benefits of the upgrade.

The front face is packed with bubble wrap, but there’s nothing else to protect it aside from the outer packing box. But they did arrive intact which is a good thing since the seller does not offer insurance and makes YOU pay return shipping on broken items.

After you unwrap the headlight assembly, you will have three items:
1 headlight assembly
1 rubber seal
1 H4 bulb


An easy squeeze of the metal clip allows removal of the protective plastic plug.
Insert the H4 bulb, being careful to avoid touching the glass part of the bulb. The bulb has three tangs and will only fit in the headlight assembly in one direction. Reattach the metal clip and press on the rubber seal as shown.


This is the old halogen headlight.
This is the new Autopal H4 conversion headlight.