
Installing Civilian FSJ Doors
on an M-715
My original M715 doors were, well, as old as the rest of the truck. They had been previously repaired and rustproofed, but one was loose (broken spot welds) and the other was on its way. Sitting behind my friend’s garage was a set of perfectly good civilian FSJ doors, complete with power windows, locks, mirrors and even SPEAKERS for a stereo system. When getting doors from the donor truck, make sure you grab the latch hardware on the cab, too!
After doing some research which involved removing the stock panel from the M715 door and staring at it, I concluded that the swap would be possible, but not without some minor surgery (use of metal cutting tools). Of course, the entire overall door dimensions were the same, but the latches are different and the civilian door window frame needs to be removed.
Before you get started, be aware that you will be drilling, grinding, and generally making a mess of things. So grab your coveralls and nitrile gloves plan on spending the better part of the day working on your Jeep!
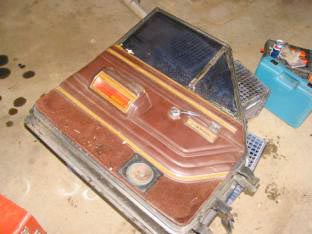
Here’s the civilian door, ready to be “militarized.”
Here’s a list of features that I wanted from each door. The items in RED are what I wanted to keep.
Civilian Door Military Door
Newer 1980+ Door latch 1960’s style Door Latch
Power Door Lock Door lock, what door lock?
Power Window Manual Window crank
Power Mirror Manually adjustable mirror
Triangle vent window Rectangle vent window
Moveable window in stationary frame Moveable window without frame
Armrest Nothin’!
Speaker Blank space
Specialized Tools that I used:
Tap and Die set
Electric Drill
12V source (I purchased a 12V drill just for this reason)
Torx bits and a socket driver to fit them
Electric or pneumatic grinder or cut off tool.
SAE Hex bits
Of course, you will also need basic hand tools that you probably already own, given that you own a Jeep.
I started off by preparing the FSJ door first. This is a good way to start. If you don’t finish this in one day, you will still be able to drive your M715 around town if you need to. I completed my second door conversion in one day. The first one took 1 ½ days. For clarification, the pictures are of my work on the DRIVER’S side door. Obviously, the passenger side door will be a mirrored image.
As you can see from the pictures, I placed the door on some milk crates to keep it off the ground and provide a better working height. It didn’t work. My back was still sore after leaning over it for a day. Maybe a table would have been better. But the crates did keep it off the concrete floor.
Remove the interior door panel first. There may be some screws along the bottom, depending on how creative the previous owners were about securing the panel. There are those funky trim clips on the two ends of the panel. There’s a special tool that you can use so that you don’t rip the clips out of the cardboard, but I’ve always used a flat screwdriver. Next, remove the reflector/chrome part of the armrest by unscrewing the two screws on the underside of the armrest, just above the reflector. If the door is standing up, the reflector will literally fall off once the two screws are removed. This will reveal the two big phillips screws that hold the armrest to the door. Remove these. Unscrew the trim panel on the power window/lock switches. Leave the switches themselves. They don’t need to be removed in order to remove the trim panel.
Using a hex bit, remove the screw holding the door release handle. You may have to wiggle the handle a little to remove it. By pulling straight up, and not at an angle, you will be able to remove the handle easier. Don’t loose the plastic spacer that prevents the door handle from gouging the trim panel.
Now the panel is free to be lifted off the door. If you are working on the driver side door, be careful of the wiring for the power mirror switch. There is not much slack in this wiring and the switch likes to fall apart spontaneously. You will see a set screw that hold the inside part of the switch to the outside part. Release this setscrew and separate the switch parts.

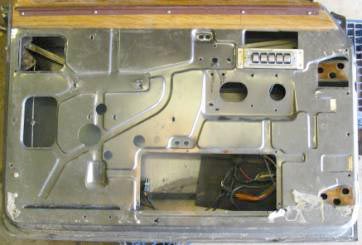
Your door will look something like this without the panel.
It will look exactly like this if your door is gray.
Remove the speaker and its surrounding mounting, including that black bar that runs across the bottom of the speaker opening. You’ll need this opening to get the power assembly out of the door. Next, locate the plug for the power window motor. The motor is a long rectangular metal box. Unplug the power motor. Now take your 12 volt source and apply power to the two pins in the plug leading to the window motor. Reverse the leads if the window goes in the wrong direction. You will see a hole (Figure A) in the door where, if lined up correctly, you can remove the window from the power track.
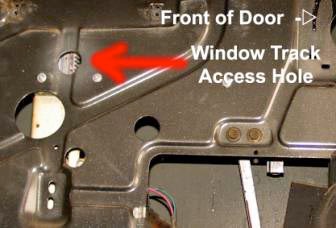
Figure A
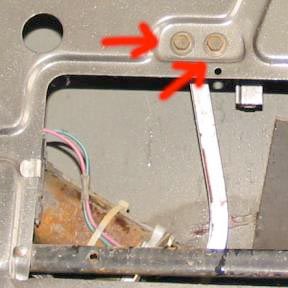
Lower or raise the window so that the end of the white flex track is lined up with the hole. You will see a small brass colored Torx screw head. Stick your hand inside the door (via the speaker access hole) and find the round piece that is behind that screw. Feel all that grease from the window track? Aren’t you glad you’re wearing your gloves? Remove that screw and the round piece will come loose. Remove it and SAVE it. You will attach the military window in the same manner. Again, take your Torx bits (different size than what you just used!)and remove all the small Torx screws that hold the power window assembly to the inner door panel. See Figure B for screw locations. SAVE these screws! RAISE the window and remove the power window assembly through the speaker opening. It looks impossible, but it can be done. Lower the window completely into the door so that the top of the window is below the top of the door.
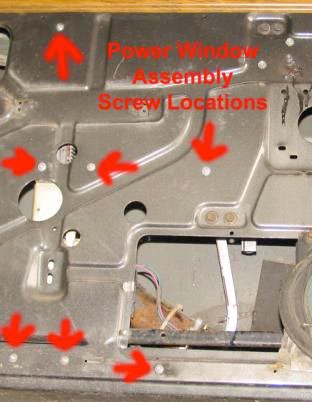
Figure B
Now comes the FUN part where you get to cut metal and make lots of sparks andnoise. Grab that grinder (not the edible kind) and some hand and eye protection. We’ll start on the rear part of the frame. The door’s window frame is bolted into the door, but it is also welded and most doors have some body filler or putty slathered all over it to make it look pretty. See the pictures for where to cut. Also look at your M715 doors for reference on how much material should be left behind. Make sure you don’t cut into the outer door skin. To avoid this, dig the cutting wheel deep into the frame and you will get a longer cut into the frame despite the confined space. Now you know why you lowered the window before doing this step!
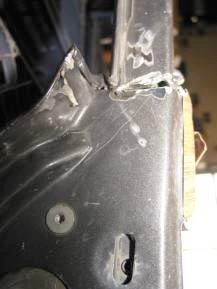
BEFORE and AFTER
Do the same cutting/grinding hack job on the front end, too. Notice that on both ends I didn’t actually cut all the way through. After cutting, we’ll unbolt the frames. Then by bending the loose parts of the frames, we will weaken and break what remains of the welds.
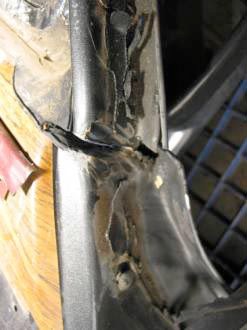
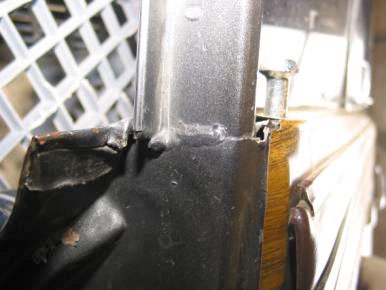
Front Frame Cut Front Frame Mounting Bolt
After the frame has been cut, you’ll want to unbolt it. There are three bolts on the rear end of the door (where the latch is) that are usually large phillips head bolts. You can see the top-most empty bolt hole in the “After” picture on the rear frame cut. There is one bolt for the front part of the frame. That bolt is right next to the top-most hinge. See the above picture for a description that makes sense.
Before you go hog wild on removing the frame, you’ll probably notice that the vent window assembly is in the way. Unscrew the 3 screws on the front diagonal part of the window frame. Also remove the four bolts that hold the lower part of the vent assembly to the door.

Now is a good time to remove the weather-stripping/ felt window wipers from the door. I use a screwdriver, but again there really is a correct tool that won’t damage the weatherstripping. Now, use a hammer and a large phillips screwdriver to push the vent window down and away from the door frame. Pull the top part towards the door latch and push the bottom part of the window guide towards the door hinge. This will allow you to remove the window (remember the window? It’s still in the door!) from the window guides. Now, rotate the window 90 degrees and you will see that the window is not a square, but rather a rectangle. The window will now be semi free to maneuver up through the top of the door and removed completely. Save the window, as you never know when you’ll need to horse-trade for parts.
With the window out of the way, move the vent window so that it is completely free from the window frame. Now you will be able to get to the bolt on the BOTTOM of the vent window guide. That bolt holds an L shaped bracket that allows it to be bolted to the inner part of the door. Remove the bolt and the L shaped bracket. Now you will be able to remove the entire vent window assembly through the top of the door. Of course you will have to angle it so it does not hit the top of the window frame.
With the window and vent window removed, you can now start flexing the window frame to start removing it. I also jammed a large flat screwdriver into the cut and pounded on it to help finish the cut. On the front part of the frame, I found that bending it back and forth worked great. Once the welds are broken, the window frame should slide out of the lower door assembly. To do this, I stood the door up and let gravity hold the door down for me while I lifted the frame.
Here’s a comparison of the two doors.

Here you can see how similar the doors really are. Notice that the manual window mounting holes are all still there, even though this door is from a late 80’s FSJ when manual windows were not usually found. Except for the door lock access hole, everything else is pretty much the same. One notable exception on the civilian door is the lack of an access hole for the rear-most bolt for the fixed window (just above the door release handle on the M715 door). This is not an issue, as it’s pretty stable with just the two front bolts.
Before you start removing the M715 door, unbolt the civilian hinges. When you do this, the backing plates will drop inside the door. Remove them and set them aside. While the civilian backing plates should be the same, I recommend using the M715 backing plates to match the hinges.
Unless you’re using a pre-1980 door, the hinges are different. The stock hinges open to almost a 90-degree angle. The 1980+ hinges don’t even come close. I like my doors opening wide, so I kept the “military” hinges.

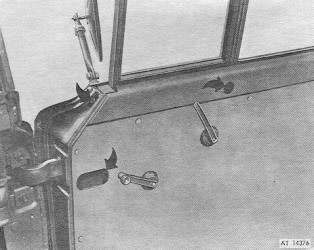
1967 M715 Hinge on the left, 1980+ hinge on the right.
In the picture above, you are looking at a top view. The cab is at the top of the picture and the front of the truck is towards the right side of the photo. The door is opening out towards the bottom of the picture. The actual door opening (where you would get in) would be on the left side.
To start on the M715 door, lower the moveable glass into the door. This will make the door less awkward to handle and reduce the chance of glass breakage. Do not remove the 6 bolts on the DOOR side of the hinge. Instead, remove the door by unbolting the 6 bolts holding the hinges to the CAB. This way, the door will not fall off, but must be lifted out. Sometimes you will have to turn the hinge brackets just the right way in order to remove the door. One person can do this, but the door is VERY heavy and I recommend 2 people to make the job safer and easier.
Remove the military mirror brackets and lay the door down on its side, with the inside facing UP. Remove the three fixed glass bolts and remove the fixed glass by pulling it up. The mounting holes’ locations are shown in the picture below. The picture above is from the M715 Zone’s online manuals.
If you haven’t already done so, remove the window crank and door release handle so you can remove the military’s version of the “trim panel.” Unbolt the lower window guides for the moveable window and remove them. Lower the window via the crank so you can reach the attaching point. The window is held to the window regulator arm via a C-clip. I used a screwdriver to thoroughly mangle the C-clip until I was able to free the regulator arm from the window glass. Once this is done, the window can be removed through the top of the door. Now you can unbolt the other end of the hinges. When you do this, the backing plates will drop inside the door. Fish them out for use on the civilian door.
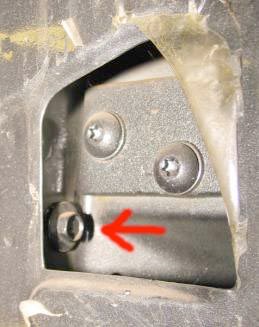
Now it’s time to install the M715 glass into your civilian door. Start by attaching the lower guides to the new door. All the bolt holes are there, trust me. I don’t have pix of this, but it will be obvious when you’re doing it. Next, install the M715 moveable glass. The glass is orientation sensitive. The rubber channel goes TOWARDS the front of the door (the end where the hinge) Make sure the rubber channel slides inside the forward lower channel. Now reinsert the power window assembly into the door. Now lower the glass all the way into the door. You may have already noticed that the civilian door does not have an access hole for the top-front fixed window bolt. BUT, the inside mounting hole IS still there. So you’re going to have to make an access hole. Below you can see my hack job. Crude and ugly, but it works. When I enlarged the hole, I came close to removing too much metal. Don’t remove all of it, or you may weaken that part of the door.

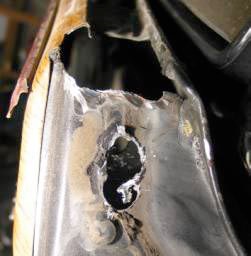
M715 door with OEM access hole Civilian FSJ door with really ugly access hole
Now that you have your access hole drilled, you can secure the fixed glass with the two forward mounting bolts. The last mounting hole ends up being hidden. I chose to let it go, because if that mounting hole was bolted, I’d have to remove the trim panel every time I wanted to remove the fixed window.
Once you’ve bolted up your fixed window, you’re ready to attach the window to the power window assembly. If you haven’t moved the window motor, it still should be lined up with that access hole. Move the window so that the hole in the end of the flex track lines up with the bottom part of the window. Using that plastic round piece that you saved, secure the window to the flex track. Now you may also notice something else. The window DOES NOT go all the way down! The bottom part of the window assembly has an angled reinforcement bracket that interferes with the door lock assembly. I didn’t want to compromise the strength of the window assembly, so removed the bottom window bumper and flipped it upside down. Use a screwdriver to carefully remove rubber and re-insert it on the other side. This will keep the window from binding on the door lock mechanism. However, the window still will not lower all the way into the door. Bending a new door lock mechanism could solve this problem. I wasn’t that ambitious, so I left it alone.
Putting the door back on is really the reverse of removal. Again, an extra helper makes things much easier, but it is doable with just one person. Good news if you’re a loner, or your spouse doesn’t want anything to do with your truck. Don’t tighten your hinge bolts just yet, though! Before that, you’ll need to replace the door latch on the cab if you’re using a newer door like I did.
Remove the old door latch assembly from the cab. Unfortunately, you’ll now notice that the old door latch mounting bolts are in a different pattern than the new latch. Bummer.
I had the luxury of using my other FSJ to create a template to determine the proper placement of the door latch on the cab. Since you’ll be making NEW holes, you will not be able to adjust the location of the latch. Another bummer. For this reason, I marked and drilled the TOP hole first. The bottom hole is more crucial in getting a good solid door close so you won’t drill for that one until you’ve got it adjusted.
Depending on where the old backing plate is, you may end up drilling into it. That’s good. More strength. To keep the backing plate tight against the sheet metal, I screwed in the old bolts so that the backing plate was held against the sheet metal of the cab. Drill and tap the top hole. Bolt the latch into place. Tighten the bolt. Adjust the door so it will close securely. You may have to adjust the hinges, too.
Remember that the bolt on the inside of the cab mounted part of the hinge controls how close the door is to the cab. The door mounted hinges control the position of the door, allowing you to move the door latch closer or farther away and moving the entire door up or down. Again, a helper works best for this. Once you have decided on the correct position for the door latch, mark the spot and remove the latch. Hold the backing plate against the sheet metal with the old mounting screws again. Drill and tap for the lower hole. Reinstall the latch. If the cab mounted latch is too far away from the door latch, use shims to move it towards the door. I ended up using two shim plates on each side.
All that is left to do is wire up the doors for power and sound. Go out and enjoy your new doors and the security that comes with having locking doors on a canvas-topped vehicle! Oh, don’t forget to remove the woodgrain panel, though!
All images and text are © 2004 Ethan Brady. Please do not steal, but feel free to link directly to this page.
